


Star clustering
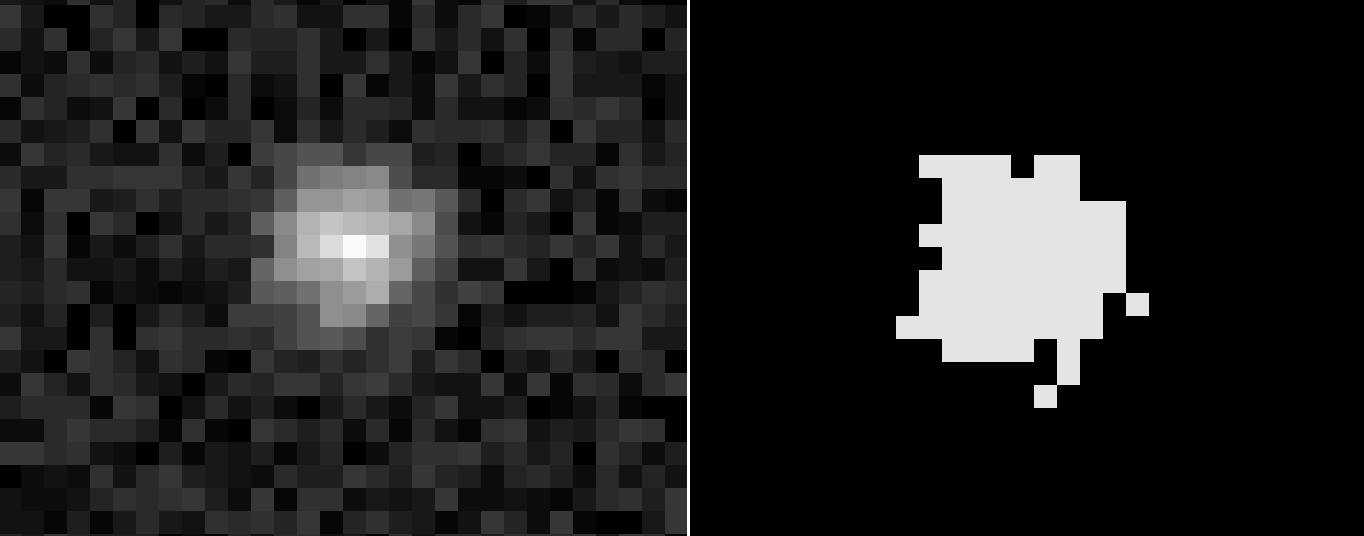
This article is about finding all the pixels which belong to a star – also known as star clustering. A short C++ implementation based on CImg is shown below. In Part 2 of my “Night sky image processing” Series I was writing about thresholding. The result of the thresholding is a binary image. In this context it means the “1” pixels belong to stars, the “0” pixels belong to the background. I used Otsu’s method to calculate an according threshold value.
Introduction to star clustering
The binary image is now further examined in a process called clustering. In simple words the pixels which belong together (i.e. the neighbours) are grouped together. The result of this clustering process is a list of pixel groups which belong together – i.e. a list of stars and the pixels belonging to each star.
The implemented algorithm is based on the paper “Improving night sky star image processing algorithm for star sensors“ from Mohammad Vali Arbabmir et. al. However, in detail it is slightly different. My implementation assumes that the supplied image cannot be modified during the process. Hence I am using a set to put all white pixels into. To me this is a good compromise between memory consumption, performance and simplicity. However, the implementation can be further improved with respect to runtime performance when one would used a 2D array for the white pixels instead of a set.
The algorithm
The clustering algorithm is relatively straight forward:
- Collect all white pixels of the binary image to a bin
- Take a white pixel out of the bin and put it aside
- Take all neighbour pixels of this pixel out of the bin and put them aside
- Repeat that for all neighbour pixels as long as no pixels have any more neighbours
- Save all the collected pixels – they belong together i.e. make up an interconnected region
- Continue with 2. as long as there are still pixels
Implementation
NOTE: All the source codes of this “Night sky image processing” series presented in part 1-7 are also available on github in the star_recognizer repository.
#include <iostream>
#include <CImg.h>
#include <CCfits/CCfits>

#include <list>
#include <set>
#include <algorithm>
#include <tuple>

using namespace cimg_library;
using namespace CCfits;
using namespace std;

void readFile(CImg<float> & inImg, const string & inFilename) {
  std::auto_ptr<FITS> pInfile(new FITS(inFilename, Read, true));
  PHDU & image = pInfile->pHDU();
  inImg.resize(image.axis(0) /*x*/, image.axis(1) /*y*/, 1/*z*/, 1 /*1 color*/);

  // NOTE: At this point we assume that there is only 1 layer.
  std::valarray<unsigned long> imgData;
  image.read(imgData);
  cimg_forXY(inImg, x, y) { inImg(x, inImg.height() - y - 1) = imgData[inImg.offset(x, y)]; }
}


typedef tuple<int /*x*/,int /*y*/> PixelPosT;
typedef set<PixelPosT> PixelPosSetT;
typedef list<PixelPosT> PixelPosListT;

/**
 * Removes all white neighbours arond pixel from whitePixels
 * if they exist and adds them to pixelsToBeProcessed and to
 * pixelsinCluster.
 */
void
getAndRemoveNeighbours(PixelPosT inCurPixelPos, PixelPosSetT * inoutWhitePixels,
                       PixelPosListT * inoutPixelsToBeProcessed,
                       PixelPosListT * outPixelCluster)
{
  const size_t _numPixels = 8, _x = 0, _y = 1;
  const int offsets[_numPixels][2] = { { -1, -1 }, { 0, -1 }, { 1, -1 },
                                       { -1, 0 }, { 0, 0 }, { 1, 0 },
                                       { -1, 1 }, { 0, 1 }, { 1, 1 } };

  for (size_t p = 0; p < _numPixels; ++p) {
    PixelPosT curPixPos(
                        std::get<0>(inCurPixelPos) + offsets[p][_x],
                        std::get<1>(inCurPixelPos) + offsets[p][_y]
    );
    PixelPosSetT::iterator itPixPos = inoutWhitePixels->find(curPixPos);

    if (itPixPos != inoutWhitePixels->end()) {
      const PixelPosT & curPixPos = *itPixPos;
      inoutPixelsToBeProcessed->push_back(curPixPos);
      outPixelCluster->push_back(curPixPos);
      // Remove white pixel from "white set" since it has
      // been now processed
      inoutWhitePixels->erase(itPixPos);
    }
  }
  return;
}

template<typename T>
void cluster_stars(const CImg<T> & inImg, vector<PixelPosListT> * outRecognizedClusters) {
  PixelPosSetT whitePixels;

  cimg_forXY(inImg, x, y) {
    if (inImg(x, y)) {
      whitePixels.insert(whitePixels.end(), PixelPosT(x, y));
    }
  }

  // Iterate over white pixels as long as set is not empty
  while (whitePixels.size()) {
    PixelPosListT pixelCluster;
    PixelPosListT pixelsToBeProcessed;

    PixelPosSetT::iterator itWhitePixPos = whitePixels.begin();
    pixelsToBeProcessed.push_back(*itWhitePixPos);
    whitePixels.erase(itWhitePixPos);

    while(! pixelsToBeProcessed.empty()) {
      PixelPosT curPixelPos = pixelsToBeProcessed.front();
      getAndRemoveNeighbours(curPixelPos, & whitePixels, & pixelsToBeProcessed, & pixelCluster);
      pixelsToBeProcessed.pop_front();
    }

    // Finally, append the cluster (if not empty)
    if (! pixelCluster.empty()) {
      outRecognizedClusters->push_back(pixelCluster);
    }
  }
}

int main(void) {
  CImg<float> binImg;
  vector<PixelPosListT> recognizedPixelClusters;

  try {
    readFile(binImg, "bin_img.fits");
    cluster_stars(binImg, & recognizedPixelClusters);

    cout << "Recognized " << recognizedPixelClusters.size() << " stars..." << endl;
  } catch(...) {
    cerr << "Problem occured!" << endl;
  }
  return 0;
}
The complete source can be downloaded here. The test image “bin_img.fits” used in this example is available here (~17MB).
I used the following command to build the source:
g++ star_clustering.cpp -o star_clustering -lX11 -lpthread -std=c++0x -lCCfits -lcfitsio
In Part 4 of my “Night sky image processing” series I am going to write about centroid determination of the determined stars.
Last updated: June 9, 2022 at 23:42 pm
Hi Carsten, can you give the original fits file “bin_img.fits”to me for you convinience, I want to use it to test your method. In Part1 “test.fit” is also welcome. Pls send them to my email.Thank you very much.
Hi John, thanks for the hint. For “Part 3” I have now uploaded the respective bin_img.fits file. It is available here. The test-image test.fit is now available here. Hope that helps! Best regards